Printing
Basic information
From some documents, you can print certain data. Templates are used to display this information in the desired form. A template is an .XLS file with markers applied in it, which indicate where and what information should be inserted.
Basic templates are already included in ERPHY (see Files, Templates category), but the user can create and use his/her own templates.
For now, there are just two types of templates: Document and Label. The Document template is used to print the information from documents (e.g. Invoice to customer). The Label template is used to print repeating blocks of information, such as labels or price tags.
Print menu
Based on these templates, a print menu of the document is formed. Each user can form his/her own print personalized menu. By default, after a new user registration or creation, each user has his/her own basic print menu.
Printing price tags
Price tags can be printed in two ways:
1. If you want to print price tags for just one product, open this product's document, click on the print button  and select the price tag.
2. Or you can select products in the Products and Services menu, and like in the previous case, click on the print button  and select the price tag.
In both cases, you will see the Label print settings form with the list of products:

Select the Price type that you need, and the quantity of price tags for each product (by default it's 1 pc). And then click on the print icon  . In few seconds ERPHY will form and send you an .xls file with your price tags.
Printing documents
To print the document you should open the document, click on the print button  , select the desired menu item, and just wait for few seconds. The document will be downloaded.
Set up Print menu
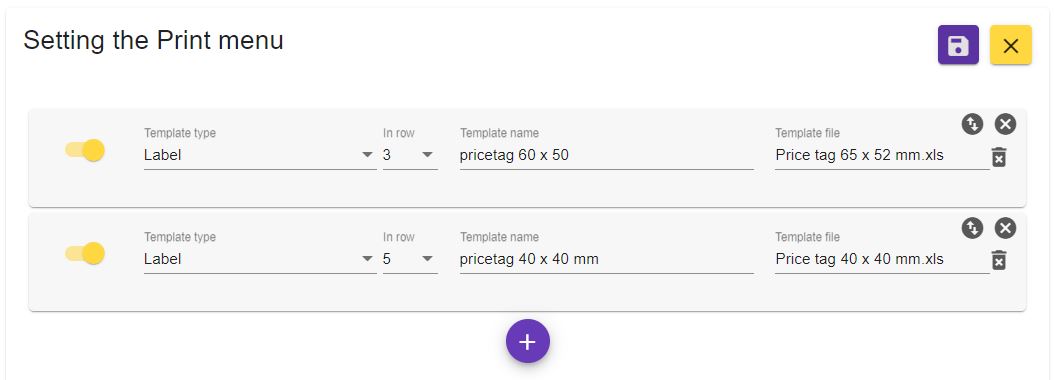
When you click on the print button  - you see the print menu. This menu is customizable for each user, and the user can set up this menu as he/she wants. To do this, in the print menu click on Configure print menu. Then you will see the window Print menu settings:

Change the place of the menu items
To change the menu item's place just drag it by the drag icon 
Delete the menu item
To delete the menu item click on the delete icon  and select Yes in the dialog window.
Change template file
If you want to use another template with the existing print menu item, you need to delete its file by clicking on the trash icon  and then select the new file template by clicking on the Add file icon
  .
.
Add new print menu item
Click on Add template button  . The new empty item will appear. Select the Template type (for Label type you can also select the number of labels in the row), input the item menu name, and select the template file. Then click Save button. Newly created print menu item will be saved and added to the print menu.